
Canadian Maple Leaf Crochet Coasters: 7 Beautiful Fall Ideas
Canadian maple leaf crochet coasters bring rich texture, bold color, and a recognizable autumn shape to a handmade table setting. Designed by Canadian fiber artist Ira Rott, this intermediate-level project transforms simple yarn into a generously sized maple leaf that can protect a surface, decorate a seasonal display, or become part of a thoughtful handmade gift.
The finished design is more detailed than a basic round coaster. Its sculpted points, visible center ridges, and extended stalk give it the character of a real maple leaf while keeping the project practical. The original sample is shown in a classic red shade, but the same design can work beautifully in orange, golden yellow, forest green, burgundy, or a coordinated fall palette.
Important: This article is an independent project overview. It does not reproduce the designer’s row-by-row instructions, stitch counts, diagrams, or copyrighted photographs. Obtain the official pattern from Ira Rott to make the project accurately.
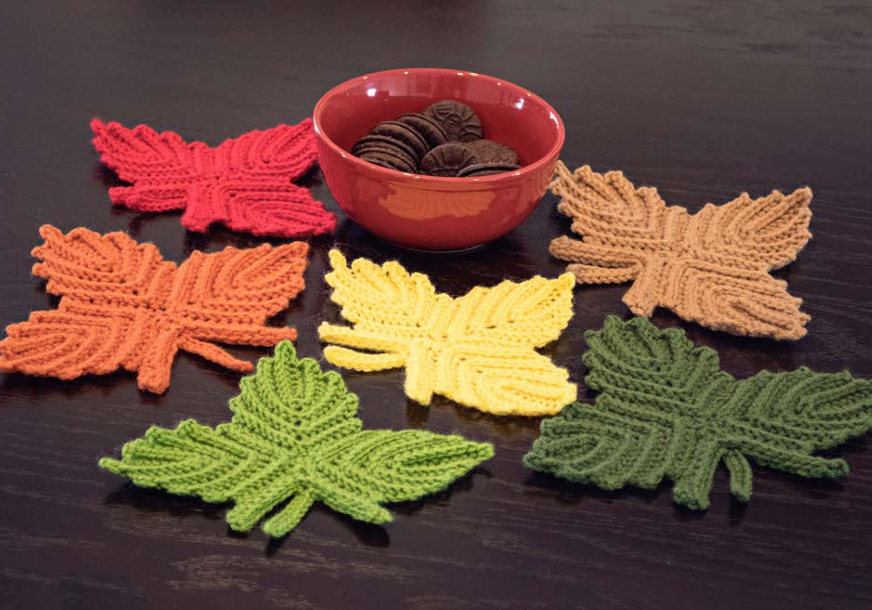
Photo to use: One complete red maple leaf crochet coaster photographed flat on a clean light-wood or pale-stone surface. Keep the full leaf and stalk visible.
Alt text: Canadian maple leaf crochet coasters in red yarn
Image note: Use your own finished-project photo or an authorized/generated image. Do not use a screenshot taken from the PDF.
Table of Contents
- Project at a Glance
- Why Canadian Maple Leaf Crochet Coasters Stand Out
- Materials and Preparation
- Understanding the Construction
- Skills Used in the Project
- Seven Ways to Style the Finished Coasters
- Color and Yarn Ideas
- Blocking and Care Tips
- Frequently Asked Questions
- Designer and Official Pattern
Project at a Glance
| Project detail | Information |
|---|---|
| Project type | Maple leaf crochet coaster or decorative applique |
| Designer | Ira Rott |
| Skill level | Intermediate |
| Finished size | Approximately 8.5 x 7.5 inches (21.5 x 19 cm) |
| Suggested yarn | Medium-weight acrylic yarn |
| Hook size | 4.25 mm (G) crochet hook |
| Terminology | US crochet terms |
| Main techniques | Shaping, post stitches, decreases, seaming, and blocking |
The finished dimensions make this project larger than a typical mug coaster. It can comfortably sit beneath a mug, small teapot, candle holder, or decorative bowl. The exact size may change with yarn thickness, hook size, and personal tension.
Why Canadian Maple Leaf Crochet Coasters Stand Out
The appeal of these Canadian maple leaf crochet coasters comes from the combination of recognizable shape and raised texture. Instead of relying only on color to suggest a leaf, the design uses shaped sections and textured crochet to form pronounced points and natural-looking veins.
The construction also gives the leaf a clear front and back. On the right side, the textured lines draw the eye from the outer points toward the center. This creates depth and keeps a single-color version visually interesting.
Because the piece is decorative as well as functional, it can move easily from everyday use to seasonal styling. One coaster can become a small accent, while several matching leaves can create a complete autumn tablescape.
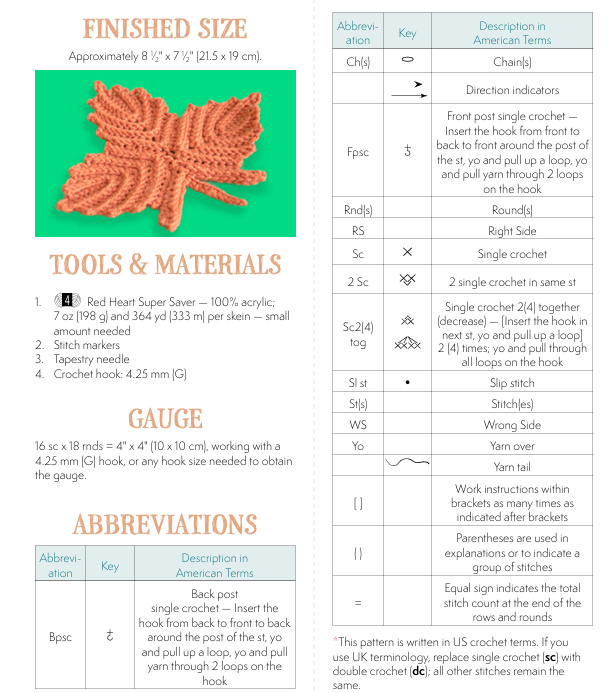
Photo to use: A close-up of the finished leaf showing the raised center ridges, shaped points, and clearly defined crochet stitches.
Alt text: Textured stitches on a Canadian maple leaf crochet coaster
Materials and Preparation
The original project uses a small amount of medium-weight acrylic yarn and a 4.25 mm crochet hook. You will also need stitch markers, a tapestry needle, scissors, and basic blocking supplies.
Prepare the following before starting:
- Medium-weight yarn in your chosen leaf color
- A 4.25 mm (G) crochet hook, or the size needed for suitable tension
- Stitch markers
- A tapestry needle for assembly and finishing
- Scissors
- A blocking mat and rust-resistant pins
- A ruler or measuring tape
Acrylic yarn is durable, affordable, and available in many seasonal shades. Cotton is another practical choice for coasters because it handles warmth and moisture well, although the finished texture and size may differ from the original sample. Always make a small swatch or test piece before committing to a full matching set.
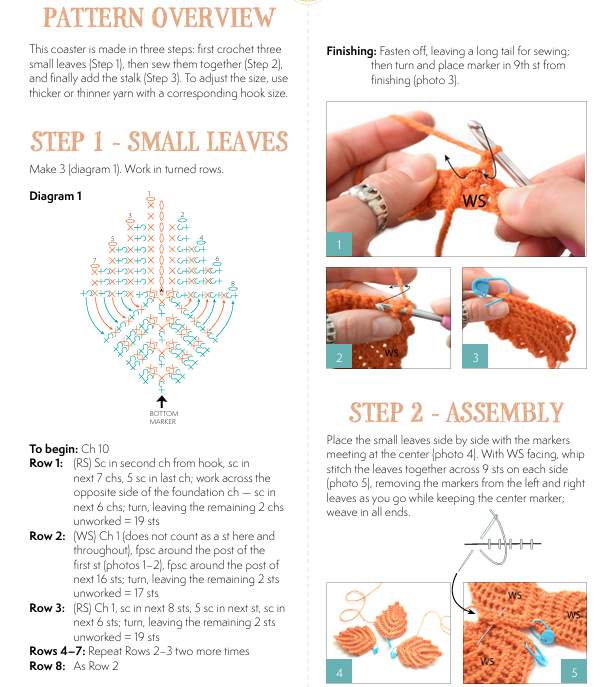
Photo to use: Red yarn, a 4.25 mm crochet hook, stitch markers, a tapestry needle, scissors, and blocking pins arranged neatly around one finished leaf.
Alt text: Materials for Canadian maple leaf crochet coasters
Understanding the Construction
The maple leaf is not worked as one simple circle. According to the pattern overview, separate shaped leaf sections are made first, joined into the recognizable maple silhouette, and then completed with the central stalk area.
This modular approach helps create the deep spaces between the leaf points. It also explains why careful alignment matters during assembly. If the sections are joined unevenly, the finished leaf can lean to one side or lose its balanced outline.
The textured surface is created with post-stitch techniques. These stitches sit around the post of an existing stitch rather than only through the top loops, producing the raised lines that resemble leaf veins. Shaping and decreases then help narrow the sections and define the pointed edges.
This overview is useful for understanding the project, but follow the official designer’s pattern for the exact sequence, counts, diagrams, and finishing method.
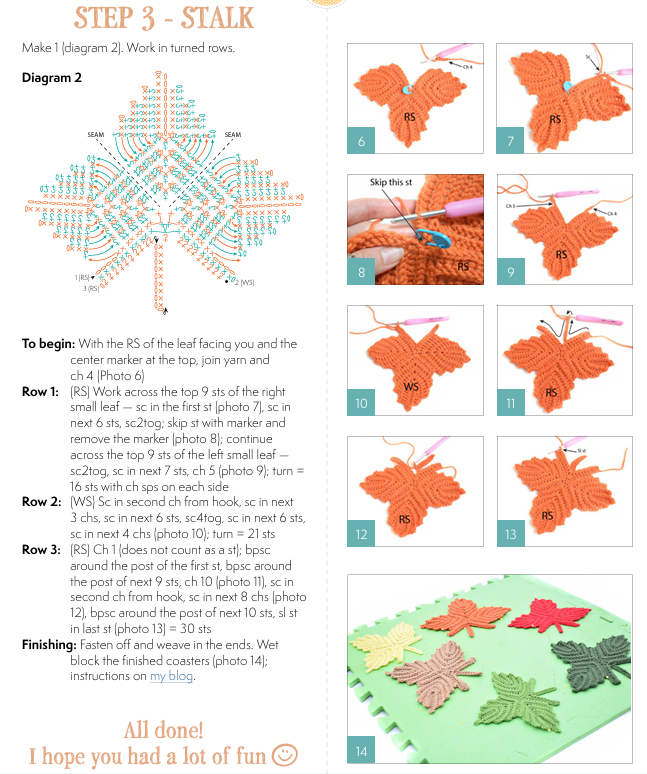
Photo to use: Natural hands holding an unfinished red maple leaf with the working yarn and crochet hook visible. Show a recognizable but incomplete leaf without displaying written instructions or a chart.
Alt text: Canadian maple leaf crochet coaster work in progress
Skills Used in This Crochet Project
This project is identified as intermediate, which is appropriate because it combines familiar crochet movements with more deliberate shaping and assembly.
It is helpful to understand:
- Chain and single crochet stitches
- Front-post and back-post single crochet
- Increasing and decreasing
- Working in turned rows
- Reading right-side and wrong-side instructions
- Placing and removing stitch markers
- Whip-stitch seaming
- Weaving in ends securely
- Wet blocking a shaped crochet piece
Confident beginners may enjoy the challenge, but they should be comfortable reading a structured pattern before starting. The most important habits are counting carefully, keeping consistent tension, and checking the orientation of each component before joining.
7 Ways to Style Canadian Maple Leaf Crochet Coasters
1. Create an Autumn Coffee Setting
Place one red or orange leaf beneath a ceramic mug and pair it with a neutral napkin. The bold shape becomes the focal point without requiring elaborate table decorations.
2. Build a Coordinated Fall Coaster Set
Make several leaves in burgundy, rust, mustard, and warm brown. A mixed-color set feels seasonal while allowing every guest to recognize their coaster.
3. Decorate a Thanksgiving Table
Use one leaf at each place setting beneath a glass or small dessert plate. Choose colors that coordinate with the table runner and centerpiece.
4. Make a Handmade Hostess Gift
Bundle two or four finished coasters with a ribbon and care card. Add a mug, tea sachets, or locally roasted coffee for a simple seasonal gift.
5. Create a Fall Garland
The designer suggests that multiple leaves can be strung together for autumn bunting. Alternate colors and leave comfortable spacing between the pieces so each silhouette remains visible.
6. Use One as a Decorative Applique
A smaller version can decorate a tote, jacket, beanie, or cushion. Attach it securely around the edges and consider how the item will be washed before choosing the yarn.
7. Frame a Single Leaf as Fiber Art
Mount a carefully blocked leaf on a contrasting textile background inside a shadow box. This turns the crochet work into simple seasonal wall decor.
Photo to use: Two or three maple leaf coasters in coordinated fall colors beside mugs on a warm wooden table, with minimal autumn styling.
Alt text: Fall table setting with Canadian maple leaf crochet coasters
Color and Yarn Ideas
Classic red immediately communicates the Canadian maple leaf theme, but other palettes can make the project suitable for different homes and seasons.
Try these combinations:
- Crimson, white, and deep red for a Canadian-inspired set
- Rust, mustard, and olive for traditional autumn decor
- Burgundy, blush, and cream for a softer modern palette
- Forest green and natural cotton for year-round woodland decor
- Charcoal and off-white for a minimalist home
- Variegated fall yarn for naturally shifting leaf color
For the cleanest set, use yarns of the same weight and similar fiber content. Mixing a firm cotton leaf with a soft acrylic leaf may create noticeable differences in size and drape.
Blocking and Care Tips
Blocking is especially valuable for a shaped project. It helps open the spaces between the points, straighten the stalk, and create a balanced outline.
Follow the care instructions for your chosen yarn. When wet blocking is appropriate, gently shape the leaf on a blocking mat and pin the outer points without overstretching them. Allow the piece to dry completely before removing the pins.
For everyday care:
- Blot spills rather than rubbing them into the stitches
- Wash matching coasters together
- Reshape each leaf while damp
- Dry flat to preserve the silhouette
- Avoid placing acrylic yarn directly against extremely hot cookware
If heat resistance is the main priority, choose an appropriate natural fiber and test the finished fabric safely before regular use.
Photo to use: Four identical finished maple leaf coasters in red, orange, mustard, and olive, arranged with the full shapes visible.
Alt text: Canadian maple leaf crochet coasters in autumn colors
Frequently Asked Questions About Canadian Maple Leaf Crochet Coasters
Are these maple leaf coasters suitable for beginners?
The source identifies the project as intermediate. A confident beginner may attempt it with patience, but experience with post stitches, decreases, shaping, seaming, and pattern reading will be helpful.
How large is the finished crochet leaf?
The stated finished size is approximately 8.5 x 7.5 inches, or 21.5 x 19 centimeters. Yarn choice, hook size, and tension can change the result.
Can I use cotton instead of acrylic yarn?
Yes, but the finished size, firmness, and texture may change. Cotton is often practical for coasters, while acrylic can produce a lighter decorative piece. Make one test leaf before creating a full set.
Why does my maple leaf look uneven?
Uneven tension, inaccurate shaping, or misaligned assembly can affect the silhouette. Check each component before joining, follow the official counts carefully, and block the finished leaf into shape.
Can the design be used for something other than a coaster?
Yes. Finished leaves can become appliques, bag decorations, garment accents, wall decor, or seasonal bunting. Respect the designer’s terms when using or selling finished pieces.
Designer and Official Pattern Source
The Canadian Maple Leaf Crochet Coasters pattern was designed by Ira Rott, a Canadian pattern designer and fiber artist. The source pattern includes the complete materials, gauge, abbreviations, diagrams, construction instructions, progress photographs, and finishing guidance needed to make the design correctly.
Visit the designer’s official website: IraRott.com
Final Thoughts
These Canadian maple leaf crochet coasters combine a bold seasonal shape with satisfying texture and several practical uses. Their generous size makes them useful on a table, while the recognizable silhouette also works well for gifts, garlands, appliques, and framed fiber art.
Choose a yarn that suits the intended use, keep the shaped sections consistent, and give the finished leaf time to block properly. For the exact construction, diagrams, and stitch information, use the official pattern and support the original designer.
Publishing Checklist
- Set the Focus Keyword to: Canadian maple leaf crochet coasters
- Use the supplied SEO title, slug, and meta description
- Add all six images with the provided alt text
- Replace the internal-link placeholder with a real related post from your website
- Link the external button to the official Ira Rott pattern or designer page
- Do not upload screenshots, charts, diagrams, or instruction pages from the purchased PDF
- Set the featured image to Image 1
One Comment